In our last post, we examined the process of 3D modeling and discussed the importance of “textures” in the 3D model. As a reminder, “textures” can be used to create a highly realistic scene. In this post, we will examine yet another way to obtain highly realistic textures: drones.
How to use Drones in Modern Litigation
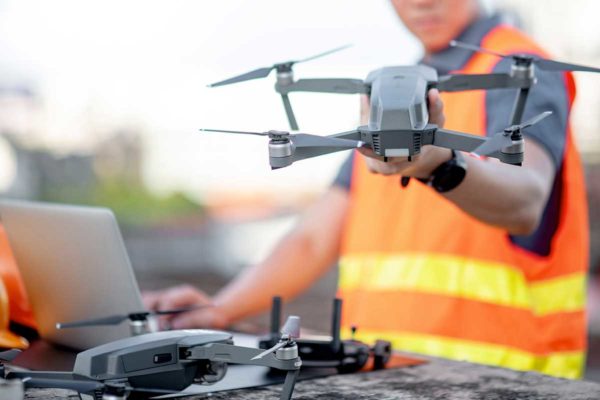
Everyone knows what a drone is these days. Most people would say that the primary function of a drone is to create a video from the air, whether produced by professionals from Hollywood or by hobbyists during weekend outings. Very few people – and even fewer attorneys – know that drone video can be extremely useful in creating a 3D model of an object or scene, for use in litigation.
01. 3D Modeling from Drone Footage
By flying in a variety of geometric patterns, while also taking into consideration a multitude of vantage points, drone videography can be post-processed to produce an entirely virtual 3D environment. During a site inspection, the video collected from the air can be saved for use in many ways. It can be ported into special photogrammetry software to create a scene, or it can be combined with LiDAR scans to add a further degree of accuracy, or it can even be used as a basis to produce “point clouds” (thousands if not millions of points, suspended in three-dimensional space) finally used to create a lattice of 3D mesh surfaces. Whichever way drone flights are integrated into your case’s project, the resulting outcome is often a beautiful rendition of the reality that is today, or the reality that was during the time of your case’s incident.
02. Post-Processing Footage
Sophisticated computer software converts the raw footage into a series of photographs – called a “sequence”. This series of photos will follow a specific time interval, such as one (1) photo every second. Because the software knows the exact interval of time from one frame to the next, it is able to pair each photograph into a sequence, along with the location information of each snapshot, during the drone’s flight. Together, these photos are converted into a “point cloud” of dots in three-dimensional space, thus resulting in a very realistic and accurate model that can be referred to over and over again throughout the litigation process.
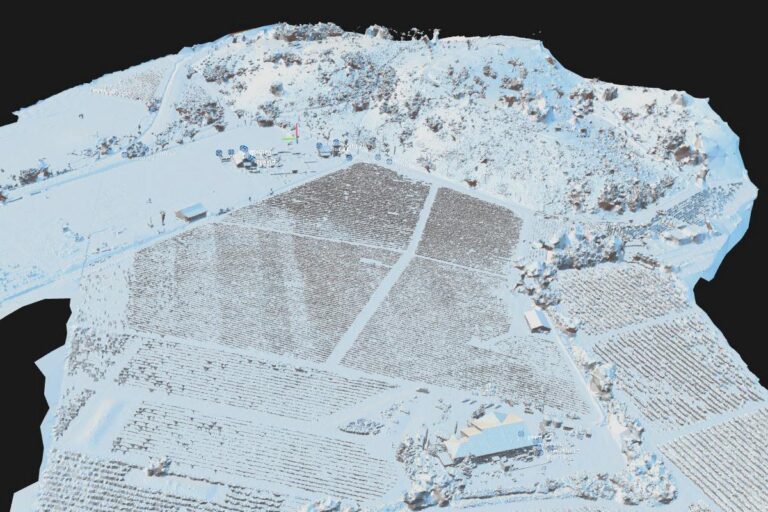

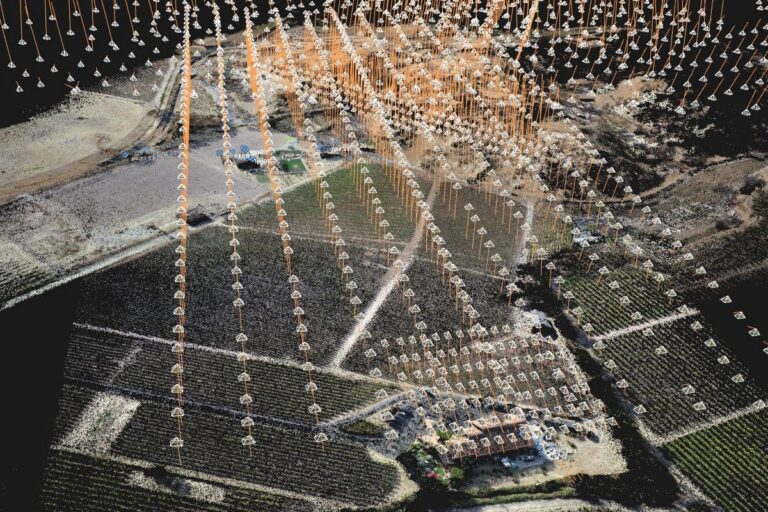
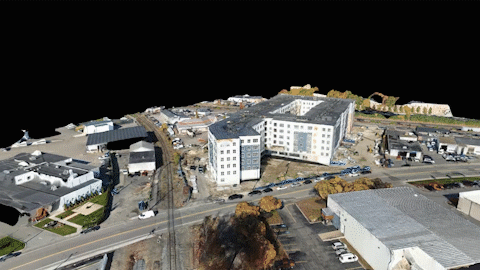
Various stages of the 3D modeling process for litigation
Once processed, the data that was previously a single or series of drone videos, now becomes an extremely valuable database of points and/or 3D surfaces, which can be measured and evaluated using additional software. What is captured in the sky is truly no longer the limit. Modern 3D software packages make it possible to “fly around” using perhaps simulated paths of travel, provided by experts, harvested from black box data, or through other crash-analysis or witness testimony. 3D terrains can be “walked through” as if an attorney, juror, or judge were onsite, in-person. Drones help bring your site location or elements of the incident (i.e. subject and/or relevant exemplar vehicles, traffic lights, signs, and other road conditions) into the limelight for a truly in-depth conversation. See below for a gallery depicting some Exhibit One models used in recent litigation, created solely from drone footage:
Exhibit One can create lifelike 3D models of any object or scene
03. Benefits during a global pandemic
Note the high degree of realism, lighting, shading, and depth that can be produced using this method, and consider the potential benefits of capturing such detailed reproductions early on in your cases’ developments. It is important to recognize that physical aspects, within your case, may degrade or change over time. By producing virtual replicas at the start and throughout your cases’ evolutions, subject details will be frozen in time, proving to be foundationally imperative during mediation, expert depositions, and trial. Communication, especially relevant now during a global pandemic, can proceed with some normalcy. In part, utilizing such virtual technologies can allow for all parties to visit the scene of an accident, or perhaps view the failed components of a product or construction defect case… all from the safety and convenience of their home offices.
At this point you may be thinking to yourself:
“Well… I don’t have a drone… but if a video is just made up of a lot of photographs, can I use my own, or experts’ photos from a previous scene/subject object(s) inspection?”
The short answer is… Maybe!
04. 3D Modeling from Photographs Only
In order to create a proper model from photographs, you will likely need several hundred photos, all ideally taken within a controlled lighting environment and without many (if any) stray subjects blocking the foreground, or interfering with the background. Simply put, you want the subject of your photos to be center-stage and everyone else out of the shot. For example, imagine you want to model a vehicle from photographs only. In order to obtain a usable 3D likeness of the entire car, you will need to have many photos taken, with a significant amount of overlapping footage, around the entire vehicle. These photos need to include a variety of angles (i.e. top, side, back, and front panels of your vehicle; both exterior and interior images, if these areas are of interest). By carefully taking one step at a time around your vehicle – making sure to take at least three (3) photos at each location: a high, median, and low shot – you will have a decent starting point to build a quality model. When capturing higher vantages of the roof of a vehicle, make sure to hold the camera above your head while aiming down at the vehicle. Ideally, if it is possible for you to get a step ladder, or some means of a higher vantage point, this will allow you to get better coverage of the vehicle’s roof.
Once you have this collection of (likely) hundreds of photos, as well as either expensive software or a company like Exhibit One, who can process these images for you, we can now turn those images into a 3D model. The photogrammetry software will initially, automatically recognize the provided photos; often there will be photographs that are not recognized right away. In this case, the operator of the software will need to identify points that match within each adjacent photo. This manual and tedious alignment process will allow the computer software to combine the photos into a three-dimensional point cloud, yielding endless value.
The Exhibit One team occasionally uses client-gathered photos when site/object inspections are not possible. Using such photographs can sometimes produce respectable results if done very carefully and methodically. However, whenever possible, supplementary inspections (often using drones) can yield a process that is more efficient, easier, and accurate.
05. A potential downside of drone-only 3d models
What is the downside of drone-only 3D models? In short, the downside is that such models do not come with any measurements, as you would get from a laser scan. With only drone photogrammetry, you are limited to the creation of a portionally-accurate 3D model; however, the model will not have any scale. For cases when the scene is basically just a background to whatever happened, this might be an easy solution to quickly create a scene. However, if 100% accuracy is required for your case, you are better off obtaining a Exhibit One Laser Scan in combination with a drone flight from our team. Both technologies can be combined to serve as a solid foundational basis. We will address some ways to get to that result in the next post.